Tools of the Trade: Weathering Essentials

As a complement to my guide to painting essentials, let's go over the equipment you'll need to master the basics of weathering techniques, whether you're just starting out or looking for recommandations to upgrade your toolkit.

Tools of the Trade: Weathering Essentials

Getting started

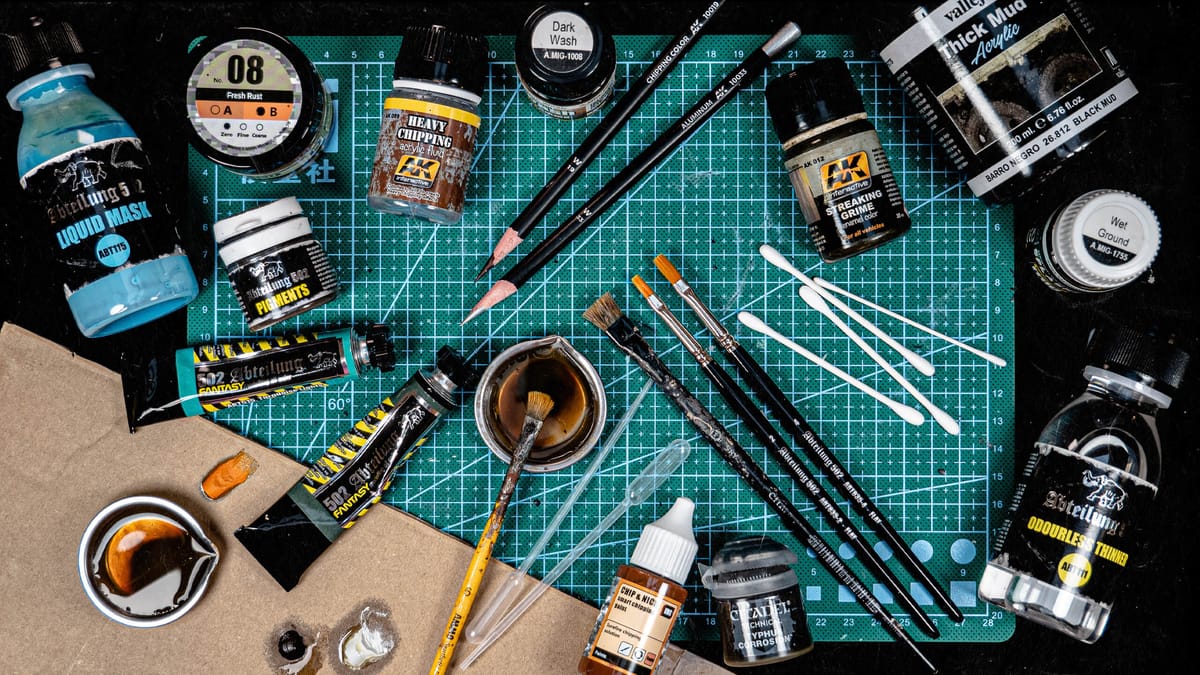
While the basic equipment for weathering is similar to what's required for miniature painting, this practice is specific enough to warrant detailed attention. The vast array of specialized tools, products and solutions available can be overwhelming for many. Leveraging my own experience, I have created a guide to assist beginners in understanding this topic, as part of a series of comprehensive textbooks filled with recommendations.

Tools of the Trade: Painting Essentials
This comprehensive starter guide dives into the fundamental equipment needed to embark on your miniature painting journey, whether you are a complete beginner or a seasoned hobbyist seeking for tips and recommendations.
Tools of the Trade: Kitbashing Essentials
Looking to get started with kitbashing? Choosing the right tools can be a real head-scratcher. Fortunately this guide is here to help you get the hang of it, whether you’re new to this or just on the look-out for equipment recommendations.

In the first part of this guide, we’ll discuss some extra tools and applicators that you may find helpful to include in your toolbox. Then, we’ll explore various products for creating chipping effects, with or without an airbrush. Following this, we’ll focus on paints used for washes, filters and panelining. Lastly, we’ll discuss different effect paints and texturing solutions while also briefly looking at some personal protection equipment.


Tools and applicators

If you haven’t yet, consider reading my guide to miniature painting essentials first, as this one only covers the gear useful for weathering techniques. Speaking of which, there are some specific tools that I find particularly useful and I’d like to highlight a few of them. In this section, we’ll discuss heavy-duty applicators such as old brushes and sponge bits. I will also briefly touch on extra supplies like cotton swabsmixing trays, and droppers.

Worn brushes

Be mindful of how you use your expensive sable-hair brushes. It's best to reserve them for lighter tasks and opt for cheaper synthetic brushes when working on more challenging projects. You should also consider holding onto your old, worn-out brushes for tasks like chipping, dry brushing and working with acrylic pastes or pigments powders. Damaged brushes can be particularly useful for creating unique random effects and scratches.

Sponge bits

Foam and sponge pieces are quite versatile. They can be used to create random chipping effects with masking fluid, to dab and layer acrylic paints to simulate rust or grime build-up or to make fine markings and scratches. Additionally, they can be soaked in paint and thinner to create subtle streaking effects that would be difficult to achieve by hand. Sponge bits are super easy to find for free, so there's no need to spend money on them.

Cotton swabs

Their primary purpose is to clean parts of a model or to remove excess paint using mineral spirits, also known as the reducing technique. It is advisable to invest in high-quality swabs specially designed for model making, as regular ones tend to lose threads and leave hairs stuck on miniatures. Believe me, discovering one of these trapped under a coat of varnish can be frustrating, so buying the right type of swabs can save you a lot of trouble!

Paint trays

I have developed a habit of using paint trays when preparing washes or thinning down paint. This allows me to work with smaller amounts of toxic substances such as mineral spirits, instead of keeping containers open and inhaling fumes for long periods of time. Moreover the spout is incredibly useful for transferring paint into an airbrush rather than mixing it into the cup directly. If you're on a budget, a mixing palette will do just fine.

Droppers

Pipettes, also known as droppers, are very useful in transferring paint into pots and diluting oil paints or enamels with mineral spirits. They are particularly helpful in achieving precise ratios when mixing paint with thinner, which can be easily replicated. These droppers are sold in large packs and are reasonably priced, however being consumable items, they will eventually need to be restocked. Definitely worth the small investment.


Chipping effects

Chipping is a popular technique among weathering enthusiasts who wish to represent worn surfaces. While it's possible to paint each individual chip by hand, this is time-consuming and requires a certain level of skills. Luckily, there are more efficient ways to achieve this. The best-known one involves acrylic fluids, but we'll also look at several airbrush-free options, including masking fluid, reverse-chipping solutions, and weathering pencils.

Acrylic fluids

Using acrylic fluids, also known as chipping medium, is a great way to quickly achieve authentic chipping effects. It mimics the look of surfaces that have been subjected to harsh environmental factors. Many hobby brands like AK Interactive, Ammo and VMS sell their own solutions that can be used to create either light or heavy worn effects. These products are best suited for use with an airbrush (see below for brush-only alternatives).

Masking fluid

Liquid mask, also known as masking fluid, is a type of latex compound that is primarily used to protect specific areas on minis. It's an excellent alternative for creating chipping effects and offers more control as compared to acrylic fluids. The best part is that it’s quite forgiving, easy to remove, and doesn’t require an airbrush. You can simply splatter or dab the fluid over a model, paint over it, and later peel it off to reveal the layer underneath.

Chip and nick

If you’re looking for an airbrush-free alternative, consider trying the ‘Chip & Nick’ smart chipping solution from VMS. This solution works by applying “smart” paint over a varnished model and then using a wet brush to remove portions of it creating the desired chipping effect. It's available in different colours and is completely reversible. This means that if you make a mistake, you can easily remove the paint with water or a dedicated aid medium.

Weathering pencils

Last but not least, consider using weathering pencils, such as those from AK Interactive. These watercolour pencils come in different colours and are perfect for adding wear, rust, dirt, and other weathering effects to your models. You can easily create fine scratches or streaks by drawing or dampening the pencil pigments with water. This is entirely reversible and a simple, cheap way to add subtle details that are difficult to achieve with a brush.


Washes, filters and paneliners

Applying washesfilters, and paneliners are some of the most crucial and satisfying weathering techniques. These methods help to homogenize the colours and shades of the model’s base coat. They also help strengthen depth and contrast by creating realistic shadows in the grooves. Let’s have a closer look at the different product modelers use to achieve these effects, namely inks, oil paint washes, and pre-made enamel solutions.

Inks

Inks are excellent weathering purposes, such as washes and stains. Their fluid consistency allows them to flow into recessed areas and panel lines, emphasizing details and adding depth to the model. Their transparent aspect and the ability to dilute them with water are perfect to create colour variations and glazing. Additionally, the quick drying times and non-toxic properties make them ideal for painters who want to work efficiently.

Oil paints

As mentioned in my previous guide to miniature painting essentials, oil paints are great to create seamless blends between colours. They are also extremely helpful for specific weathering techniques involving panelining, washing, glazing, and splattering. Mixing these paints with thinner allows you to create custom dilutions for pin washing models, staining base coats, and achieving subtle fading or streaking effects on surfaces.

Enamel solutions

Enamel-based washes, filters, and paneliners are specifically designed to stain and pin wash models. They come pre-diluted but can be thinned down even more and dry quickly, unlike oil paints. These paints come in a wide variety of colours, and their names are often descriptive, which makes them easy to use. As opposed to enamel weathering effects, these paints do not add any texture to the model and are transparent for the most part.

Thinner

When working with oil and enamel paints, you will need thinner (also known as mineral spirits or turpentine) to adjust the thickness and transparency of the paint. Be aware that it isn't safe to use in enclosed areas, therefore I highly suggest using an odourless version, such as the one offered by Abteilung 502. This variation of regular thinner has a milder scent and is considered safer due to its lower volatility and reduced emission of fumes.


Weathering and texturing

There is a wide range of options available to create authentic weathering effects, each with specific renderings such as rust and grime streaks, dust and dirt deposits, mud splashes, oil stains and more. While most of these enamel-based paints have a slightly textured property, we'll also explore alternatives to create texture in a more pronounced way such as acrylic texture pastes, pigment powders, and binders to achieve this.

Streaking effects

While it's possible to achieve streaking effects with oil paints, there's a vast selection of enamel paints available from brands like AK Interactive and Ammo, which are ready to use. Streaking effects are mainly used for painting dripping rust and grime over vehicles and scenery, but they can also be used on smaller miniatures. It is also worth considering other options that offer different finishes, such as slimy effects, fuel stains, and many more.

Deposit effects

Additionally, there are a variety of enamel paints available to recreate the appearance of abandonment and decay. These paints can mimic environmental effects like accumulated dust and dirt, moss deposits, crusted rust and more. They're perfect for making your projects look more realistic and three-dimensional. Like all enamel paints, these can be applied as is and blended with thinner to create smooth transitions between colours.

Nature effects

Lastly, let's quickly touch upon enamel-based options for creating nature and terrain effects. These paints are usually thicker in consistency and may have a glossy finish. They can be used to depict various ground and splatter renderings, like dried earth, upturned dirt, fresh mud, and more. They're particularly useful for painting vehicles and dioramas. Moreover, these paints can be mixed with fine plaster to increase their consistency.

Texture pastes

Acrylic texture pastes are another excellent way to add a sense of depth and realism by simulating various natural effects such as corrosion, crackling earth, thick mud and more. You can apply them with a brush to specific areas on your models, bases or dioramas to achieve the desired effect. Most popular hobby brands such as Citadel, AK Interactive, Ammo, and Vallejo sell a wide variety of acrylic pastes with different purposes and finishes.

Pigment powders

Pigments powders are useful for creating dusty renderings, which is challenging to achieve with paint alone. Many people overlook this method because they believe those powders are volatile and don't stick well to the miniature. Fear not, when applied correctly, pigments rarely move, even with frequent handling. Additionally, one can set them in place with a fixer or convert them into homemade textured washes or pastes with binders.

Pigment binders

Speaking of binders, enamel-based and alkyd-based binders are liquid solutions that can be mixed with pigment powders. This mixture can then be used to create homemade washes or texturing pastes that retain their vibrant colour and dusty-looking properties. While enamel-based binders are great for achieving streaking or splattering effects, alkyd-based binders can help create texture build-up like mud or rust that will harden as it dries.


Personal protection

Lastly, I can’t stress this enough, but safety should consistently remain your top priority in all your creative pursuits. Although hobbying may appear innocuous, this practice involves generating dust and handling tools or substances that can harm your eyes, lungs, or skin. Therefore, it’s imperative to exercise caution and take appropriate safety measures such as wearing a respirator, glasses, and gloves when necessary.

Respirator

Wearing a mask may sound overkill—and that’s surely why it’s so rarely highlighted—but it’s essential to protect yourself. A respirator is a mask-like device that covers the nose and mouth, along with replaceable cartridge filters designed to filter out harmful dust and particles, gases, vapors, or fumes from the air you breathe. It’s a sound investment that will come in handy during all those hobby-related activities that require lung protection.

Safety glasses

Miniature work requires proximity to our subject and the tools involved. Although a paintbrush logically poses no harm, the same cannot be said for pointy blades positioned centimeters away from your eyes or potentially hazardous products. It may seem excessive, but protecting your eyes with safety glasses is an inexpensive yet crucial investment in protection against sharp objects, debris and splashes of dangerous liquids.

Nitrile gloves

As with your lungs and eyes, protecting your hands is just as important when working with products with stinging or toxic properties. Nitrile gloves are an excellent solution, and always come in handy whether you’re employing an airbrush, working with enamels, or harmful substances like mineral spirits, resin, and other hazardous chemicals. Acquiring a box of disposable gloves is an inexpensive investment which is set to last a long time.


Parting thoughts

I hope this guide on the fundamentals of weathering tools has answered some, if not all of your questions. This list is non-exhaustive, and as a general rule of thumb creating your first hobby toolkit should remain a step-by-step process that caters to your objectives and budget. Starting with the basics and expanding from there is the wisest approach, preventing unnecessary expenses on equipment that may not see much use.

Remember that equipment, while important, won’t make you a better artist. Practice and creativity drive the search for solutions, not vice versa, and you’ll soon learn that less is more when it comes to painting supplies. If you found this post valuable, feel free to subscribe for free to share your thoughts below and keep up to date with future publications. Alternatively, you can become a supporter to help me create more content.