Weathering 101: Basics of Realistic Effects

Let me guide you through my general process for achieving realistic weathering effects on miniatures. Starting with the basics of priming and undercoating, we will delve into advanced techniques such as chipping and streaking.

Weathering 101: Basics of Realistic Effects

Introduction

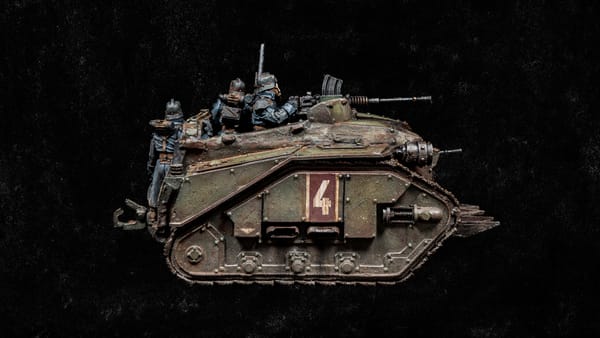
I'm thrilled to share with you the debut installment of my new series on weathering techniques. In this tutorial, I'll be explaining step-by-step how I create realistic effects on miniatures. This method is versatile enough to be used on both large model like sceneries or vehicles, as well as smaller models. Moreover, this is an excellent way to improve your painting skills and get a better understanding of the fundamentals, so let's get started!

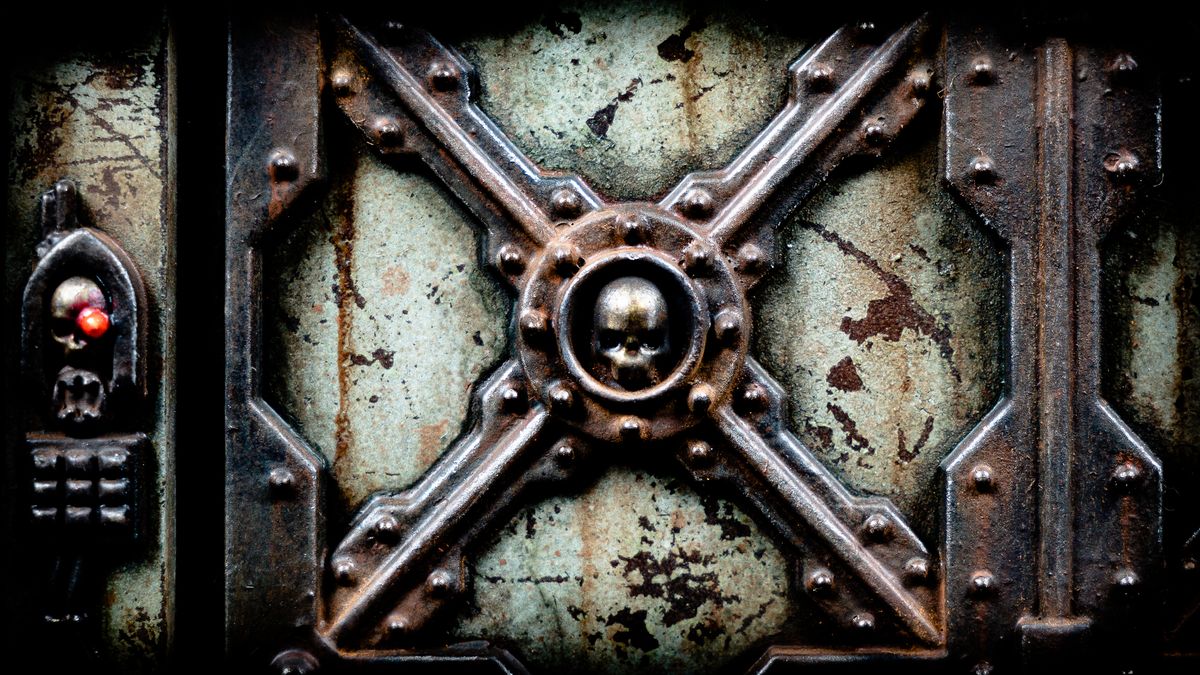
This guide has been designed as an introduction for those who are new to weathering techniques. We will explore how to use acrylic fluids, oil paints, and pigment powders to create a weathered, well-used appearance that adds character and depth to your work. Starting from priming and undercoating through chipping and streaking, I will break down my complete process so that you can achieve a similar result to the one shown below.


Tools and materials

To make things as clear as possible, I will be providing links and references for all the products I use at each stage of this tutorial. A detailed PDF version of this tutorial is also available to all members, subscribe for free to download it. Please note that most paints are interchangeable with the ones you have, so feel free to experiment and adjust this list to your preferences before purchasing anything new. That said, here's what we'll need:

  • Synthetic brushes
  • Airbrush (optional but recommended)
  • Paint trays / Mixing palette
  • Cotton swabs
  • Acrylic chipping medium
  • Thinner
  • Top-coat varnishes
  • Surface primer
  • Acrylic paints
  • Oil paints
  • Pigments powders (optional)

For the record, I won't cover the basics in this article, such as thinning down paints or using an airbrush. Instead, we'll be diving straight into weathering shenanigans, assuming that you already have a basic understanding of miniature painting. Last but not least, keep in mind that some techniques involve hazardous products, so it's important to exercise caution. For more info on equipment, check out my painting and weathering guides below.

Tools of the Trade: Painting Essentials
This comprehensive starter guide dives into the fundamental equipment needed to embark on your miniature painting journey, whether you are a complete beginner or a seasoned hobbyist seeking for tips and recommendations.
Tools of the Trade: Weathering Essentials
As a complement to my guide to painting essentials, let’s go over the equipment you’ll need to master the basics of weathering techniques, whether you’re just starting out or looking for recommandations to upgrade your toolkit.

Preparatory steps

Before we move on to the exciting weathering stages, there are a couple of preparatory steps to first tackle that will significantly ease our process later on. Though straightforward, these steps are essential and shouldn't be overlooked. In this section, we'll cover two crucial aspects: priming the miniature which will provide a solid base for our paintwork to adhere to, and then undercoating in preparation for the chipping method.

Priming

We'll begin by priming the miniature. For this project, I opted for regular black surface primer from Vallejo which I airbrushed directly from the bottle without thinner. Regardless of the type of primer you use, it's important to apply the primer in thin layers to ensure clean results, preserve intricate details and avoid splattering or smearing. After priming, I allowed the model to cure for approximately 20 minutes before moving on to the next step.

First the miniature is primed with acrylic surface primer

Undercoating

The following step in the painting process is commonly referred to as the undercoat. Much like an anti-rust primer, this layer establishes the primary colour for the chips and scratches that we are about to do. Although precision is not critical as most of it will be covered by the base coat in the next segment, make sure to apply it in thin, even coats. This will prevent excessive paint buildup that could blur the finer details of the miniature.

In this example, I started with a base layer of LifeColor Burned Rust, which I then highlighted with a mist of LifeColor Rusted Umber. At this point, the specific colours of paint don't matter, so feel free to use any similar shades you might have. To avoid a uniform appearance, both layers were applied in a relatively random manner. I also intentionally left some areas with the surface primer visible to create a bit of colour modulation.

Then the undercoat is applied in thin layers with an airbrush and gloss varnished

After the paint had dried, I applied an even coat of gloss varnish. It is crucial not to overlook this step since it plays a significant role during the chipping stage. Sealing the acrylic paint with a varnish is essential to protect it from potential damage. Without this protective layer, the chipping method could cause the paint to peel off, exposing the primer or, worse, the plastic surface beneath. As an added precaution, I left the varnish to cure overnight.

Acrylic fluid application

Following the previous step in which I sealed and secured my undercoat, my next task was to apply the chipping fluid all over the miniature. This should be done before base coating the model. To do this, I airbrushed thin layers of AK Interactive's Worn Effects acrylic fluid vertically and horizontally, ensuring that the product did not pool in the recesses. In case you do not have a spray gun, I recommend a few brush-only alternatives in this guide.

Working with chipping medium may seem daunting at first, but it's quite simple as long as you follow a few guidelines. Remember to apply the product in thin layers and avoid using too much, as this can cause pooling on the surface. If you do notice pooling, simply use a cotton swab to blot away any excess. It's worth noting that this type of fluid has a working time of around 30 minutes, meaning it needs to be painted over and reactivated quickly.

Base coating

Once the chipping fluid was touch-dry, I began airbrushing my base coat over it with successive thin layers of acrylics. For this step, I selected four colours from the Vallejo Model Color range. I started with Green Sky, followed by Pastel Green and Pale Blue. Lastly, I applied a light mist of Light Green Grey. It should be mentioned that the base coat is intentionally bright in colour and will be toned down considerably in the next steps.

The chipping fluid is covered by successive thin layers of acrylic paint forming the base coat

Weathering stages

Moving on to the good stuff: the weathering stages. This is what I like the most in miniature painting as it gives way to a ton of experimentation and creativity. It's also extremely forgiving to the artist because the oil paints that we are about to work with can be reworked and reduced, as opposed to acrylics. In this segment we'll review how to unify and contrast with oil paint washes, and finally we'll look at how to use pigment powders.

Chipping

The chipping method is very simple. First, you need to dampen the surface of the miniature with water. Then, it's only a matter of using a stiff brush to gently scrub the paint off. Be random in changing the direction and intensity of the brush strokes to obtain a more realistic result. You can use different tools to achieve convincing chipping effects, such as a toothpick, or a piece of steel wool. Feel free to experiment and have fun with it!

Feel free to experiment with different tools to create all kinds of scrapes and chips

It may take a few seconds for the water to reach and reactivate the acrylic fluid underneath the paint, so take your time, be patient, and avoid using brute force. It's better to work in sections rather than wetting the whole model at once because the fluid will begin to cure upon interacting with water. As a general rule of thumb, less is more when it comes to chipping. I went a little overboard myself but most of it will be painted over in the next step.

The chipping effect is ultimately achieved by gently brushing the surface with a wet stiff brush

Colour blocking

At this point, all I had left to do was colour blocking the remaining elements supposed to be made of metal. First I base coated them all in black to create a sturdy foundation for the metallic acrylics. Speaking of which, I first painted a layer of Scale75's Decayed Metal which was then highlighted with Scale75's Black Metal. The various cables and pipes were left unpainted in black, while the remaining skulls were coated in Scale75's Necro Gold.

The remaining details are first base coated in black and then painted over with metallic acrylics

Staining

This step is going to set the tone for the rest of the paint job and from now on we will only be using oil paints. Unlike the pin washing method, which focuses solely on grooves and recesses, we're going to stain the entire model with a wash of oil paint mixed with mineral spirits. Doing so will alter the acrylic base coat colour and give it sickly green hues. This will also make it more homogeneous, while increasing shadows and contrast all over.

The oil wash is applied vertically all over the miniature with a flat brush

Technically speaking, this step is fairly simple. For this to work, your oil paint needs to be highly diluted. In a paint tray I mixed a blob of Winsor & Newton Burnt Umber oil paint with odourless thinner (1:2 ratio). I've also added a few drops of oil paint enhancing medium to speed up the drying process. It was then applied to the entire piece with a flat brush. Excess pooling was guided into the recesses and drawn to the bottom of the miniature.

The vast majority of the wash is then soaked up with a cotton swab

Be careful, paint thinner is a toxic product so it's recommended to wear a mask and gloves and work in a well-ventilated area. As absurd as it sounds, the next phase was to reduce the majority of what I just painted. For reduction, I've used clean cotton swabs soaked in thinner, dabbing over the excess where I wanted more brightness, and pushing it into the recesses to reinforce shadows. In this way, I was able to strengthen the contrast greatly.

Streaks are painted with what is left of oil paint on the miniature

To conclude this step, the miniature was lightly heated with a hair dryer to accelerate the evaporation of the thinner and to get rid of its shine. I then proceeded to create a first round of streaking, pulling what was left of oil paint on the model in a vertical, top-to-bottom fashion, with a clean brush moistened with thinner. This step requires a bit of back and forth to achieve a convincing result, so take your time and enjoy the process.

The model is entirely stained with an oil wash and a first pass of streaking is done

Metal darkening

I then moved on to darkening the metallic elements. Just like in the previous step, I made a wash with oil paint and mineral spirits (1:2 ratio) but this time I went with Abteilung 502's Starship Filth. This dark-grey colour works wonders with metallic paint and will give it a faded, soot-like aspect. To begin, I focused on the flat metal surfaces, in an attempt to avoid regularity and simulate wear or patina that would have accumulated over time.

A second oil wash is heavily applied all over the metallic elements

The remaining wash was then carefully spread over the recessed areas in a constant effort to further accentuate the contrast and shadows on the model. I also took a moment to blend the few remaining stains featuring visible contour with a clean brush moistened with thinner. After completing this step, you will notice a significant change in the appearance of the metallic paint. It should appear darker upon drying with a blackened, soot-like finish.

The leftover wash is pin washed into the recesses to further reinforce shadows and contrast

This simple treatment of the metal makes it more visually interesting, while accentuating the overall contrast on the model. In the next step, we will focus on highlighting the metal edges to further enhance the texture and create a more realistic finish. After ensuring that the mineral spirit had completely evaporated, I sealed the paint job with a matt top-coat and left the model untouched overnight to allow the varnish to cure completely.

Metal parts now have a sooty appearance after varnishing

Streaking

It was finally time to bring in warmer tones and carry out the final streaking layers. For this, I settled on two washes of oil paint mixed with mineral spirits (1:2 ratio). I first started with Abteilung 502's Dark Rust and then I came back with Light Rust for some minor touch-ups. At this stage, it was only a matter of adding more streaks to create points of visual interest as well as pin washing key areas, focusing where rust could have accumulated over time.

The final streaks are painted and a rust wash is applied to key areas

As in the previous step, it's critical to instill realism in your scene when it comes to painting streaks on flat surfaces, or at least convey a sense of gravity. Tell yourself stories, try to think about areas that are prone to weathering and rusting. Doing so will help to decide where to emphasize the effect in the model. For my part, I focused on places that could retain moisture, such as around the rivets and various protruding nooks and crannies.

The hard edges of the metallic elements are highlighted with a weathering pencil

I then took a moment to paint the remaining details and highlight some of the metallic elements like the tip of the rivets, again using Scale75's Decaying Metal. I also decided to go over some of the hard edges with an aluminium-coloured weathering pencil. After the thinner had fully evaporated, I sealed the paint job with one last coat of matt varnish. At this point, all that was left for me to do was to add bit of pigment powders on the model.

Final streaking is achieved with more oil paint

Pigments dusting

To add the final touches, I meticulously applied different shades of pigment powders to accentuate the rusty and dusty feel of the environment. Using Black Smoke from Abteilung 502, I brushed all the metallic elements and exhausts to create a sooty look. Then, I applied Fresh Rust Spot-on-Pigments by VMS to the areas where rust had already been painted, further enhancing the contrast and decrepit appearance of the metal parts.

The pigments are gently brushed over the surface and blended with the rest of the paint job

Make sure you use pigments sparingly for optimal results. Rather than dipping your brush directly into the pot, brush off any excess onto a paper towel before applying it to your model. This will help avoid over-applying the pigment. If you do end up applying too much, don't worry—a small amount of isopropyl alcohol (IPA) on a cotton swab can be used to dissolve the excess. However, be careful as it can damage the paint layers underneath!

To finish it up dry pigment powders are applied over the model

A quick dusting of the miniature with an airbrush or a gentle blow of air can help remove any unwanted particles. Even if you plan to handle the miniature a lot, you may not have to worry about the pigments moving around too much. If this is a problem for you, you can use a pigment fixer to set the pigments in place. However, be warned, I find that it can alter and darken the colour and texture of the pigments. And with this, the paint job is complete!

The pigment powders are applied on areas that could potentially collect rust over time

Parting thoughts

Practice makes perfect, and it is especially true when it comes to weathering techniques. It may take some time to master but this tutorial is a great starting point and terrain pieces make good canvases for learning the basics and improving your skills. If you've found this guide valuable, feel free to subscribe for free to share your thoughts below. Alternatively, you can become a supporter to help me create more content and access exclusive posts.